Fusion Splicing the Complete Guide
What is Fusion Splicing?
This is a method of connecting two pieces of optical fiber. The ends of two pieces of fiber are mated in a precise way so that light can travel through the fiber. The joining of the two fiber ends must be done in such a manner that the light is not scattered as it passes through the location of the two spliced ends. This process is used when a cable has been severed and needs to be repaired or the cable just needs to be lengthened. This method of splicing welds and permanently connects two optical fibers together. This splice in many instances produces nearly zero reflection and provides consistent results when done by a trained installer.
How Does Fusion Splicer Work?
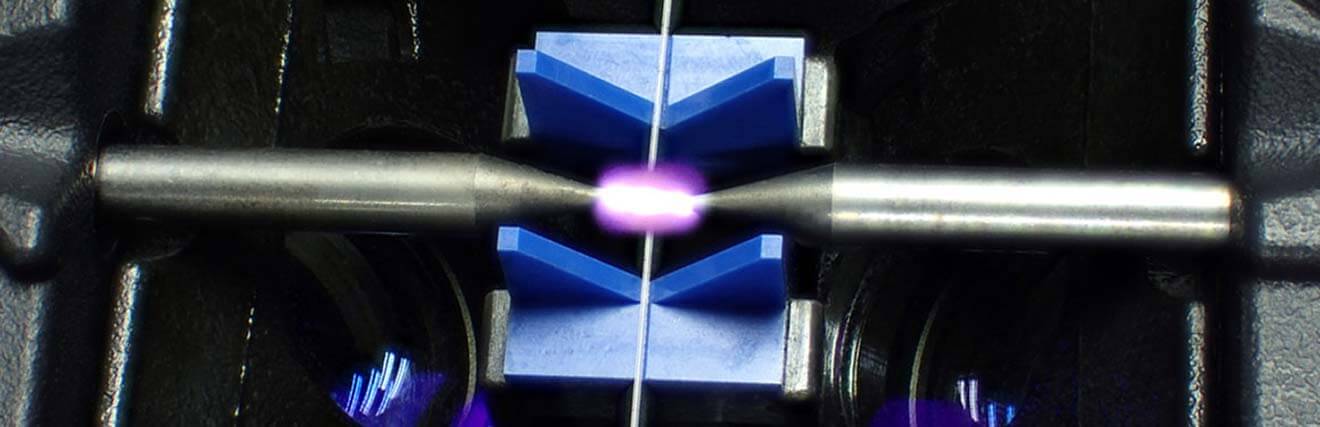
A fusion splicer is a pretty straight forward piece of equipment. It creates an electric arc which produces a weld that permanently bonds the optical fiber. In order to get to this point the operator must prepare the fiber properly. Once this is done each fiber end is loaded into a holder in the splicer. From here the machine does the rest of the work. Once loaded, the splicer cameras align the fiber by using motors. Even though the fiber is cleaned before the fusion takes place, the splicer sends a tiny spark that is used to burn any impurities missed by the initial cleaning. Once this process is completed, the optical fiber is permanently fused using an electrical arc which is produced by the splicer. If done correctly, optical loss should be minimal.
Choosing the Right Fusion Splicing Equipment
You need to choose the correct equipment for the job at hand. Without it your job is only half done. The correct equipment always makes your job faster and easier. It avoids frustration. As we know now a fusion splicer creates one piece of fiber by fusing two separate pieces of fiber together. This is a tool no installer should be without. There are many fiber optic fusion splicers on the market today. All with different options and costs. If you cannot justify the purchase of one, rentals are available at reasonable costs. Here are a few things to consider when choosing the correct splicer.
Types of Fusion Splicers on the Market
CORE ALIGNMENT SPLICERS (three-axis alignment)
This type of splicer is ideal for fusing singlemode fiber because it provides very precise fiber core alignment which is necessary for small core fibers. Typical splice loss is only 0.02dB when verified with OTDR testing. Core alignment splicers are essential if you are splicing new fiber to older legacy fiber, which tends to have inconsistent core geometry. Core alignment splicers can also be used to enhance the performance of multimode fiber.
ACTIVE V-GROOVE SPLICERS (movable V-groove)
Some newer types of clad alignment splicers have an "active" (movable) V-groove. This mechanism provides more precise fiber alignment than a "fixed" v-groove splicer. The accuracy of this new type of splicing machine makes it well suited for single mode fiber splicing, FTTx applications and splicing done in the manufacture of optical components.
CLADDING ALIGNMENT SPLICERS (fixed-groove, single-axis alignment)
Commonly used for ribbon splicing, this splicer aligns fiber along a single axis. Internal cameras and a fixed-groove aid in the alignment of the fibers. Clad Alignment Splicers have a typical splice loss of 0.05dB SM and are suited for multimode fiber or single mode fiber applications.
A quality fusion splicer will align and fuse fibers so precisely that the splice will not significantly impede data throughput along the optic link. A good fusion splicer will provide you with important splicer information such as system status, splice loss values, diagnostics, maintenance information, arc test results, help menus and more. Choose a fusion splicer that has a display screen that is easy to read under various lighting conditions.
What Training Does an Installer Need to Complete a Splice?
Making a quality splice with little reflection is extremely important. Keeping this in mind, training is an important factor in creating a proper splice. Correct preparation is paramount. An installer needs to be able to strip, clean and cleave the fiber. Using the fusion splicer itself is fairly easy as the machine does most of the work. A fusion splicer is specifically designed to precisely weld the fiber. A few hours of training and a bit of practice and you should be up and running.
Items Needed for Splicing
• Fiber Stripper
• Fusion Splicer
• Alcohol Wipes
• Fiber Splice Connector
• Fiber Cleaver
• OTDR
When to Perform Fiber Optic Splicing & Termination
There are three instances when you perform a fusion splice to a fiber optic cable. This is done when optical fibers have been damaged, to extend the length and finally to connectorize the optical cable.
- Damaged Fiber Optic Cable-When fiber cable is accidentally damaged or cut it’s time to get out the fusion splicer. In many instances digging with a backhoe will cause the break. There are thousands of breaks every year due to backhoe damage. This is known as “backhoe fade”. Moles are always present, they are another problem that causes cable damage. Moles have a habit of chewing through cable
- Extending Cable-Extending cable is another reason to use fusion splicing. Sometimes the cable is just not long enough or it needs to be extended for new construction or the network itself needs to be extended to additional locations. Either way it’s time to get out the fusion splicer.
- Terminate the Cable with a Connector-Another reason is to connectorize the cable. This is the process of adding a connector to terminate the optical fiber. This is often done with pigtails, which are lengths of tight buffered fiber cable that are terminated with a fiber connector. The tight buffered fiber with the connector on one end is fused to the raw fiber. This allows the fiber cable to be connected to or plugged into a fiber patch panel. It enables flexibility and a quicker connection and disconnection
Steps Needed to Complete a Fusion Splice
There are four important steps to completing a successful fusion splice. Both fiber ends must be prepared with care and in the following order. Failure in one of these four critical steps means a an inferior or useless splice.
- First you must strip the fiber. To prepare the fiber for fusion splicing, the protective polymer coating around the optical fiber must be removed. This can be accomplished by using a manual mechanical stripper or a thermal stripper.
- Next you need to clean and cleave the fiber. This is best done using a precision fiber cleaver. Note - you are not cutting the fiber. You are breaking the fiber by introducing a crack. At this point the break must be precise. The ends must be perpendicular and smooth across the axis. In other words the break must be “clean”. Prior to cleaving the fiber you must be sure to clean the stripped fiber with isopropyl alcohol or a similar fiber optic cleaning solution.
- You are now ready to join the fiber together with the fusion splicer. This process involves the alignment of the two ends of the fibers and the melting of those fibers. Once the end faces of the fiber are aligned the splicer uses an electric arc to produce the fusion of the two fibers and permanently join them.
- The final step is to protect the fusion splice from damage such as stretching or rough handling. You should place a protective heat shrink sleeve around the fusion area. These sleevesare specially designed protector sleeves which provide support to the splice area.
Here’s How to Test Your Fiber Optic Splice
You need to test your splice to evaluate how well it will perform. Once a fiber is spliced in a fusion splicer the machine will tug on the new splice to ensure it is strong. Most new fusion splicer equipment can give you some idea of the splice loss. However, this is only an estimate. You really need an OTDR to determine your results. An OTDR will analyze fibers and can confirm the quality of the cable runs by measuring light loss along the fiber cable. Here’s exactly how it’s done. It really is pretty easy.
First, place one of the markers or cursors (usually called 1 or A on your OTDR) just before the reflectance peak. Next, place the second marker (referred to as 2 or B on your OTDR) just after the reflectance peak. The OTDR will calculate the loss between the two markers. Reduce inaccurate measurements by making sure your markers are not placed on curved parts of the trace. What about measuring reflectance? Similarly, place the first marker before the reflectance peak and the second at the top of the peak.
Calculating Optical Loss After Completing a Fusion Splice
Fusion splice loss happens when a certain amount of light is reflected while passing though the splice. This loss is measured in decibels. The amount of optical power lost at these connections is always a concern. Here’s where an OTDR comes in handy. In simple terms, it will measure the loss from an optical fiber splice. It will also measure length and find faults. It takes a picture of the original installation and stores it. This picture can be compared to another picture of the same cable should a problem arise with it at a later date.
VIDEOS: Learn more about fusion splicer operation
https://www.fiberinstrumentsales.com/video-category/fusion-splicer-operation